


Esta vez me llego un requerimiento que específicamente requería Windows Server 2022 usando PowerShell y algo curioso es que requerían dos EBS de diferentes tamaños y como es algo que seguramente tendré que volver a hacer mejor lo escribo aquí para que no se me olvide.
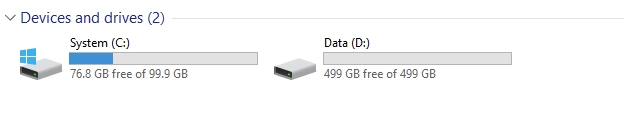
Uno que era C: requería 100GiB y el otro debería ser D: con 500 GiB entonces empecé a crear mi configuración en Terraform.
Primero mi aws_instance resource usando el parámetro ebs_block_device:
1resource "aws_instance" "windows_infra_instance" { 2 ami = local.ami 3 disable_api_termination = true 4Pero al lanzar la instancia y verificar que se montaran los dos EBS note que Windows solo detecta C: por default y el resto queda como unallocated space.

Como no estaba creando la partición D: automáticamente agregue un script de PowerShell como userdata usando la función templatefile de Terraform:
1resource "aws_instance" "windows_infra_instance" { 2 ami = local.ami 3 disable_api_termination = true 4Lo agregué en la carpeta scripts:
1# Script for detecting unallocated storage and creating a partition 2$DiskNumber = 1 # Change this to the appropriate disk number 3$DriveLetter = "D:" # Change this to the desired drive letter 4Pero no estaba funcionando entonces busqué más y me encontré este artículo de AWS:
Y cambie mi script agregando el código que recomendaban.
1Stop-Service -Name ShellHWDetection2Get-Disk | Where PartitionStyle -eq 'raw' | Initialize-Disk -PartitionStyle MBR -PassThru | New-Partition -AssignDriveLetter -UseMaximumSize | Format-Volume -FileSystem NTFS -NewFileSystemLabel "Data" -Confirm:$false3Start-Service -Name ShellHWDetectionVolví a lanzar la instancia y verificar si se había creado la partición, pero no la estaba creando y de hecho parecía que ni corría el userdata. Después de investigar parecía que el error era de EC2-launch, pero busque logs y no encontré nada.
Lo extraño era eso que no encontraba logs, según la documentación para EC2 Windows con EC2-launch app v2 los logs se encuentran en
1C:\ProgramData\Amazon\EC2-Windows\Launch\Log\UserdataExecution.logPero al revisarlo no había nada así que supuse que era algo con la configuración de las instancias Windows 2022.
Entonces descarte seguir buscando en la instancia, pero algo que se discutió con el equipo y que hasta cierto punto hizo sentido fue que a lo mejor no creaba las particiones porque aún no cargaba completamente el sistema y terminaba de correr el userdata sin pasar por la parte que creaba la partición.
Y en algún momento vi un comentario de crear una tarea para que se ejecute una vez se haya iniciado el sistema. Y probé con este script:
1$script = {Get-Disk | Where PartitionStyle -eq 'raw' | Initialize-Disk -PartitionStyle MBR -PassThru | New-Partition -AssignDriveLetter -UseMaximumSize | Format-Volume -FileSystem NTFS -NewFileSystemLabel "Data" -Confirm:$false}2$action = New-ScheduledTaskAction -Execute "C:\Windows\System32\WindowsPowerShell\v1.0\powershell.exe" -Argument "$script"3$trigger = New-ScheduledTaskTrigger -AtStartup4Register-ScheduledTask -Action $action -TaskName 'Mount EBS Drives' -ScriptBlock $script -Trigger $triggerPero al tratar de buscar las tareas en el Task Scheduler no encontraba la que había creado “Mount EBS Drives“ pero no me iba a detener ahí. Necesitaba ver si estaba detectando el userdata y en algún punto, encontré un comando de PowerShell para leer el último archivo de userdata muy útil:
1Get-EC2InstanceMetadata -Category UserData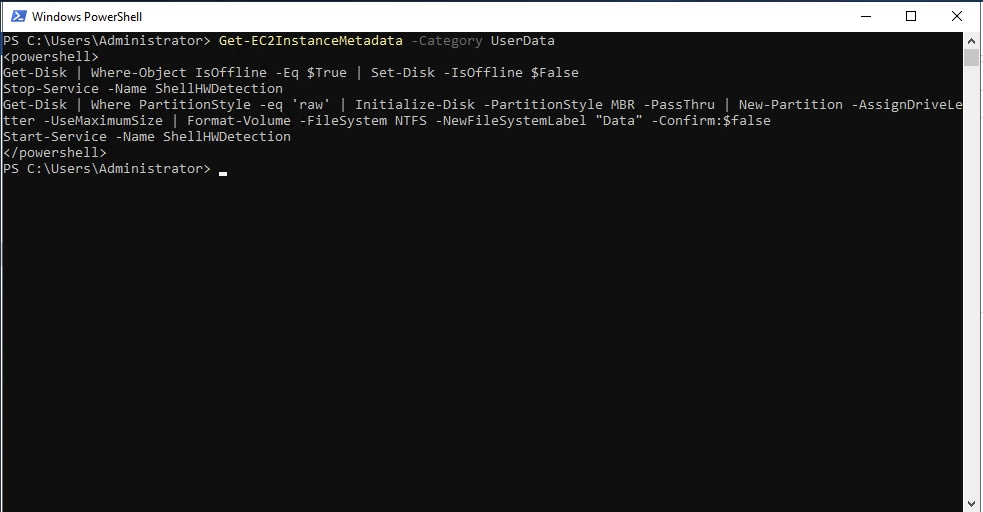
Además, puedes utilizar esta URL (http://169.254.169.254/latest/user-data) para descargar la última versión del userdata.
Siguiendo con la documentación de AWS me encontré con este artículo y vi que <powershell></powershell> era necesario y lo agregue:
1<powershell>2Pero seguía sin funcionar, entonces note que PowerShell no debe tener espacios o saltos de línea así que probé de nuevo, pero quise cambiar el script para que en lugar de crear la tarea mejor tratara de crear directamente la partición como al principio.
1<powershell>2Stop-Service -Name ShellHWDetection3Get-Disk | Where PartitionStyle -eq 'raw' | Initialize-Disk -PartitionStyle MBR -PassThru | New-Partition -AssignDriveLetter -UseMaximumSize | Format-Volume -FileSystem NTFS -NewFileSystemLabel "Data" -Confirm:$false4Start-Service -Name ShellHWDetection5</powershell>Lance nuevamente la instancia y aún no creaba la partición para lo cual en este punto ya pensaba que era un tema de compliance de la instancia que no permitía la ejecución de scripts, pero quería probar una última vez y seguí buscando en la documentación donde encontré esto:
Note
If the EC2Launch script does not initialize the volumes, ensure that the volumes are online. If the volumes are offline, run the following command to bring all disks online.
Get-Disk | Where-Object IsOffline -Eq $True | Set-Disk -IsOffline $False
Entonces agregue esa línea al script sin dejar espacios o saltos de línea y relance la instancia.
1<powershell>2Get-Disk | Where-Object IsOffline -Eq $True | Set-Disk -IsOffline $False3Stop-Service -Name ShellHWDetection4Get-Disk | Where PartitionStyle -eq 'raw' | Initialize-Disk -PartitionStyle MBR -PassThru | New-Partition -AssignDriveLetter -UseMaximumSize | Format-Volume -FileSystem NTFS -NewFileSystemLabel "Data" -Confirm:$false5Start-Service -Name ShellHWDetection6</powershell>Y para mi sorpresa la partición se había creado usando el espacio libre que tenía.
Después de pellizcarme varias veces y de varios días trabajando con esto por fin pude entregar ese servidor.
Comentarios